
In my previous post, Identity Governance 101: Popular User Stories, I talked about the basics of identity governance and most popular governance user stories in the IAM domain. Following the same topic, let’s dive deep into User Self Registration and how you can see it in action with WSO2 Identity Server.
The Concept
Self registration is the most used method to get a user registered to an online system. Most online services we use regularly such as Google, Facebook, LinkedIn, Twitter, etc. uses this method. Simply said, if you wanted a new user account on these platforms, you’d go to their website and register your self as a user. Each service ask their own set of questions from you. Mostly starts with your E Mail (well, except for Google :p ) and then your personal details such as name, address, contact information, etc. This concept is know as User Self Registration.
As I mentioned in my previous post, there’s another way to get this done, which is using a third party identity provider. The buttons you might see in the registration pages such as Register with Google or Continue with Facebook are there to do that.

User Self Registration with WSO2 Identity Server.
WSO2 Identity Server is a free and open source identity management framework that anyone can use to cater various identity related use cases. For the purpose of this post, I’m using the IS version 5.11.0.
Let’s look at how you can use WSO2 IS to self register users to your organization. First, go ahead and download the latest IS version from GitHub.
To try out the feature with bear minimum requirements, just fire up the Identity Server by executing the wso2server.sh file inside the bin directory. (Use the wso2server.bat file if you’re on windows.)
- Wait for the server to start, and access the URL https://localhost:9443/carbon.
- Login to the management console using default admin credentials of admin and admin.
- On the Main menu, click Identity > Identity Providers > Resident.
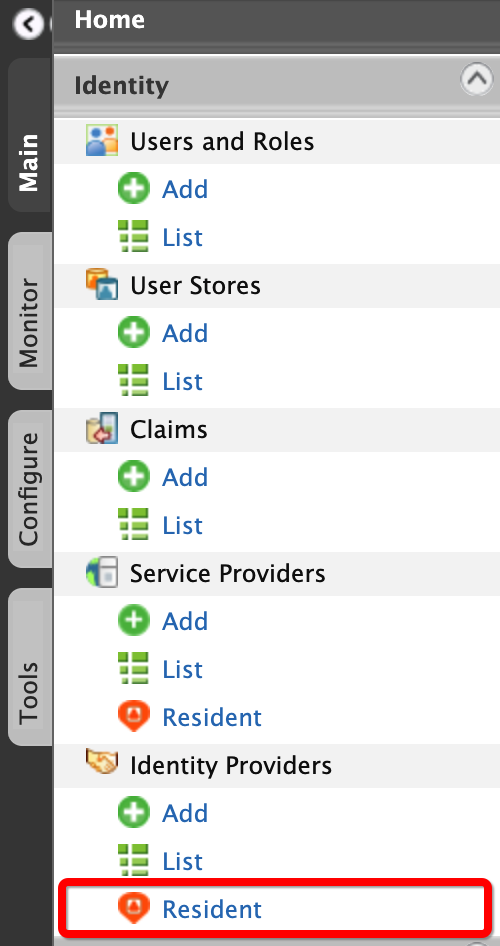
- Then User Onboarding > Self Registration.
- Tick User self registration and un-tick Lock user account on creation, and click on Update to save the changes.

You’re all set. Not let’s test this out!
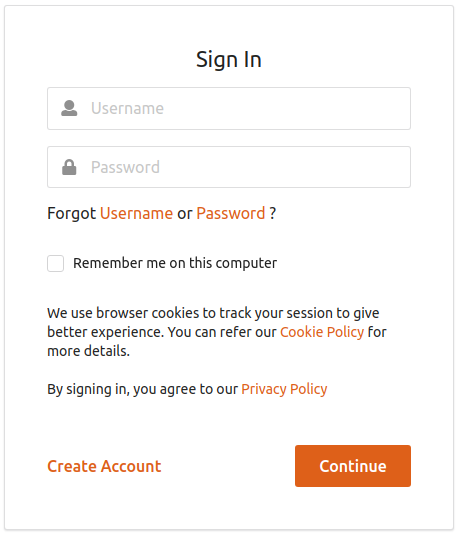
Self registration kick in when someone tries to access an application secured with WSO2 Identity Server. Since this is a fresh server, you won’t have any apps, right? Well, we can use the in-build myaccount application. Access the URL https://localhost:9443/myaccount. You’ll be presented with a nice login page like below with a Create Account button at the bottom.
Click on that and you’ll be asked to enter a username first. Once you clicked on Proceed, you’ll see a form to collect some general information about you.
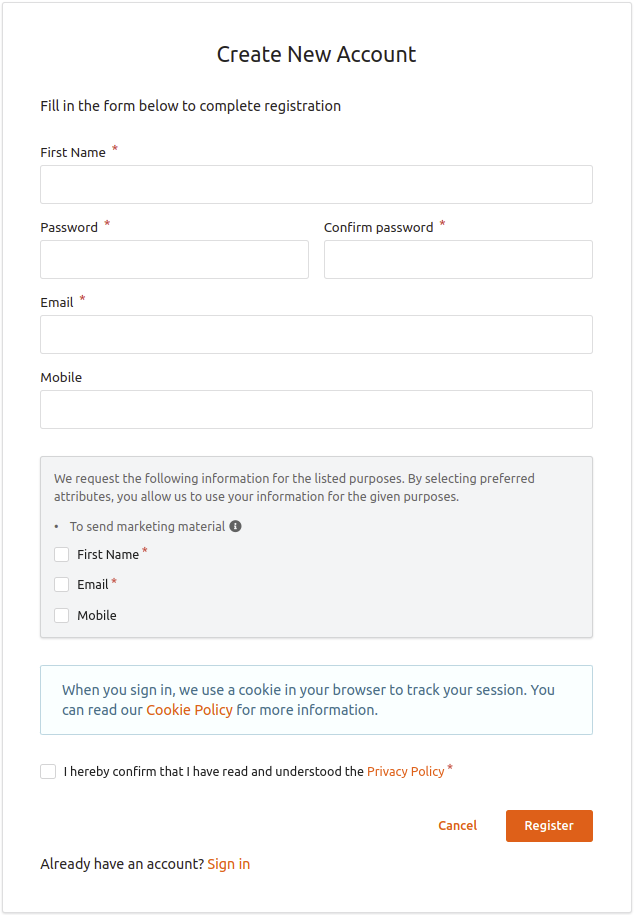
Once you fill this out and clicked on Register, a new account will be created for you. You should be able to login to your newly created user account now.
Advanced Use Cases
Let’s see what else we can do with the User Self Registration feature of the WSO2 Identity Server.
Lock User Account Until Email Verification
We can ask the users to verify their emails before completing the account creation process. Once the registration form is filled, the server will send an email to the user’s given email address with a special link. When the user clicks on this link, the email verification will be completed. Until this is done, newly created user account will be in a locked state and if the user tried to login, an error message will be displayed, like below.

To do this, the server needs credentials of an email account. You can provide these credential by adding the below config at the end of the repository/conf/deployment.toml file inside the server.
# SMTP email sender settings.
[output_adapter.email]
from_address= "wsoistest@gmail.com"
username= "wsoistest@gmail.com"
password= "<PASSWORD>"
hostname= "smtp.gmail.com"
port= 587
Now remember, if you’re using a Google account for this purpose you need to enable access to less secure apps on the account first. Go to https://myaccount.google.com/u/2/lesssecureapps and login to the G-Mail account you wish to use, and enable access.

Now that we’ve configured email credentials, restart the server. To enable account locking, go to Identity Providers > Resident > User Onboarding > Self Registration and enable Lock user account on creation.
Configure Registration Form Attributes.
As shown in the above image, by default the Identity Server ask a general set of user attributes on the registration form, such as first name, last name, email, etc. But you have the capability to customize this form according to our specific requirements. To do this, click on the Manage Self-Sign-Up purposes section on self sign up settings.

In this section, we’re going to define a new consent purpose to be used with self registration. In simpler terms, we’re defining a reason to collect the user’s information. This concept was introduced with GDPR and WSO2 Identity Server is fully compliant with it. To read more about consent purposes, see this.
- Click on Add New Purpose.
- Provide a suitable Purpose Name and a Description. These will be displayed on the registration form. Check the below example values.
- Purpose Name: Internal Purposes
- Description: These values we collect will be used only for internal purposes and we never share them without your direct consent.
- Click on Add PII Category and select a user attribute that you wish to collect from the user. You can tick the Mandatory check box to denote that attribute is in fact mandatory.
- Repeat the same process to add all the attributes you want.

You can click on finish to save the changes. Now try to register a new user again and you should see the form is changed now. You can notice that the purpose name is shown in the form and the description will come up as the tool tip.

reCAPTCHA for Additional Security
You can enable reCaptcha to prevent brute force attacks on your system. This will make sure that all the users register through our form are in fact real people and not bots or scripts. We need to configure reCaptcha service to the server first and Google is the most popular service provider.
- Go to https://www.google.com/recaptcha/admin.
- You will see the following window. Fill in the fields and click Register. The following are sample values:

Make sure to note down the SITE KEY and the SECRETE KEY that will be shown in the next screen.
Now we can add the configurations to the WSO2 IS. Open the repository/conf/deployment.toml file in the server and add the below config to the end.
# Google reCAPTCHA settings
[recaptcha]
enabled = true
api_url = "https://www.google.com/recaptcha/api.js"
verify_url = "https://www.google.com/recaptcha/api/siteverify"
site_key = "<SITE KEY>"
secret_key = "<SECRET KEY>"
Restart the server for the changes to take effect. Now go to self registration settings and tick the check box of Prompt reCaptcha to setup reCaptcha on our self registration form. Now you’ll see the Google reCaptcha check box is loaded in the registration form.

Other Settings.
There are some more settings that you can make to customize your self registration experience.
- Change self registration verification link expiry time.
- You can define the validity period of the email verification link.
- Enable SMS OTP
- Verify user account using SMS
- Send sign up confirmation email
- Send an email to the user once the registration is completed.
- Prompt reCaptcha on re-send confirmation
- Enable Auto Login After Account Confirmation
I think that’d be enough for now! Although if you have any questions, please don’t hesitate ask in the comments.
See you in another post! 🙂
