

Today, the world has arrived towards an era that every business needs to use technology as the backbone of their day to day operations. Not only business, the non-profits ventures and even religious organizations also had to embrace the technology to fulfil their needs. As a result of that, having good computer systems has become a pillar of the success of modern corporates.
Even though these computer systems have increased the productivity and service quality of the daily operation, it comes with threats against the confidentiality, integrity and availability of the information that handles by these systems, which are counted as assets of the organization. Those threats can be caused by various types of computer-based attacks.
With the integration of computer networks to these systems, the number of possible attack types multiplies further. Because of this situation, large and medium companies tend to invest millions of bucks to perform security audits for their corporate IT systems, networks and infrastructure in a recurring manner.
Vulnerability assessment and penetrationtesting are the most common security audits in the system and network security auditing. As explained by Baloch (2017), Penetration Testing or pen testing is the process that identifies vulnerabilities of a system and verifies whether those vulnerabilities are truly exploitable by an unauthorized party. Despite, a vulnerability assessment just points out all the vulnerabilities of a system or network regardless of their exploitability. Since the penetration report contains no false-positive vulnerabilities, it is a more convenient choice to perform security audits.
A penetration test identifies and simulates attack vectors that an attacker is able to take advantage to intrude into the security perimeter of an organization while documenting the findings along with the recommendations to mitigate the identified threats as noted by Graves (2010). The following Penetration Testing Framework defines how to carry out a successful pentest in three different phases as a blueprint.
Disclaimer: The information mentioned below is for educational reference only. The publisher has intentionally blurred public IPs and most organizational brands on the following figures due to security reasons.
Phase 1: Pre-Attack
1.1 Introduction
Graves (2010) has stated Pre-Attack is combination phase of Reconnaissance (gathering sensitive information regarding the target that has already available in other sources.), Scanning (Locating IP block and network topology of the targeting network) and Footprinting (Valuable information regarding the Operating System running on the target).
Besides these, the pre-attack phase includes a documenting part to satisfy the legal and defensive requirements of the pentester and the client.
1.2 Procedures
The author suggests following the step-by-step process illustrated in figure 1 to perform the pre-attack phase.
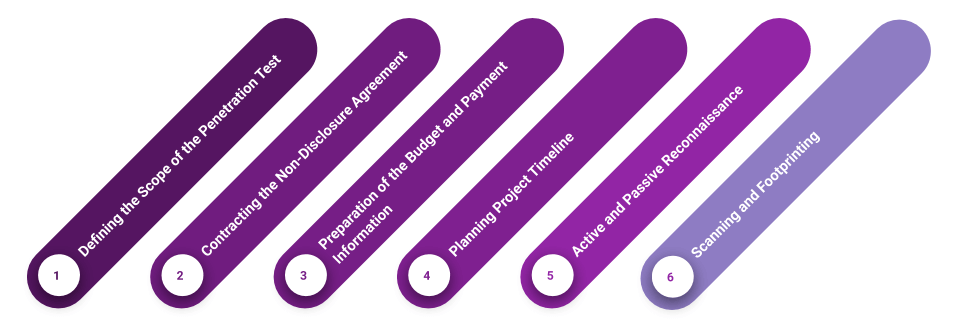
- Defining the Scope: The scope of a penetration test is documented as the Penetration Testing agreement, which includes the type of test (announced/unannounced), security areas concerned on the test, boundaries, time duration and deliverables/outcomes of the test. For instance, companies that handle cardholder data must comply with the Payment Card Industry (PCI) Data Security Standard (DSS) and therefore may require both PCI testing and a full penetration test to ensure all critical areas of IT infrastructure and Data Security are thoroughly assessed. On the other hand, a company may only require a general security test of the external systems, such as web applications – a more focused testing that can be done in a shorter period of time.
- Contracting NDA: Non-Disclosure Agreement (NDA) is a legal document that enables to share resources or information between two or more parties confidentially. In a Penetration test, the client (Disclosing Party) prepares an NDA and the pentester sign the NDA as the Receiving Party to legally get bound for using client data in an authorized manner.
- Budget Preparation: The pentester should provide an estimated budget along with the payment details to perform the fund transfers and should get approved the budget by the client. The budget can be calculated based on count (E.g.: no. of machines) or attack surface. It is best practice to present three budget options with feature limitations.
- Planning Project Timeline: Providing a timeline/schedule for the penetration test based on individual components and tasks along with durations using professional project management tools like Gantt Charts, Kanban Boards.
- Reconnaissance: Pentesters conduct Active (engaging the target) and Passive (from external resources) reconnaissance by using the tools mentioned in the 2.1.3 section.
- Scanning and Footprinting: Scanning enables pentesters to distinguish IP block and the network topology of the target. Footprinting reveals the OS running on the target. Footprinting (fingerprinting) tools are mentioned in 2.1.3 section.
1.3 Tools and Techniques
Pentester must select the most effective tools mentioned below based on the target to carry out a proper reconnaissance.
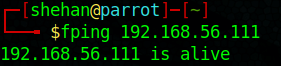
Ping
Verify the availability of a remote host via ICMP.
Issue PING or FPING with the target IP on the Terminal / Command Prompt as below.
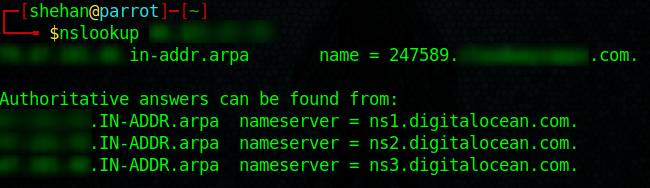
DNS Lookup
Identify the DNS server and mail server IPs.
Issue NSLOOKUP with the target IP/Domain on the Terminal / Command Prompt as below.
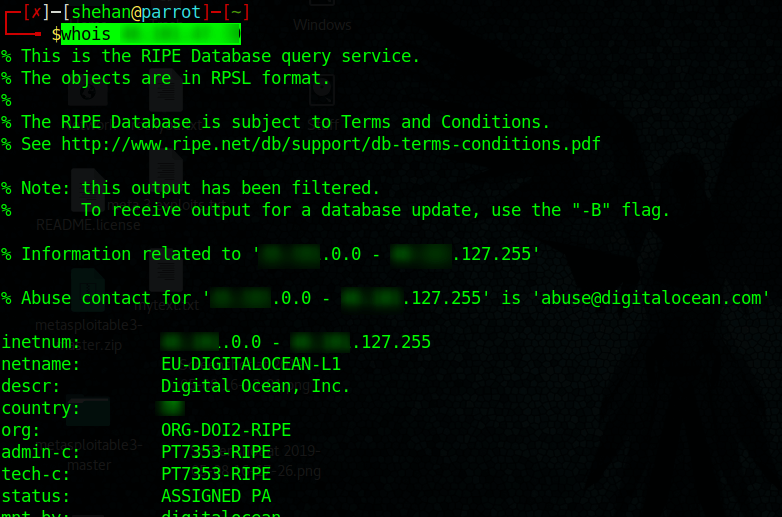
WHOIS Lookup
Finding DNS servers, Contact details etc. associated with a domain.
WHOIS lookup can be done via the ICANN website: https://whois.icann.org But there is a better way to perform this via ParrotSec terminal as a Cyber-Security expert as below.
Online Website Auditors
Finding sensitive data related to target from online lookup tools.
There many online auditing tools that present many statistics about a website or domain. One of the best examples is Netcraft (https://www.netcraft.com), An online security audit tool for websites.
Way Back Machine
Finding sensitive data related to the target from past achieves of the website.
Navigating the achieves through https://archive.org/web

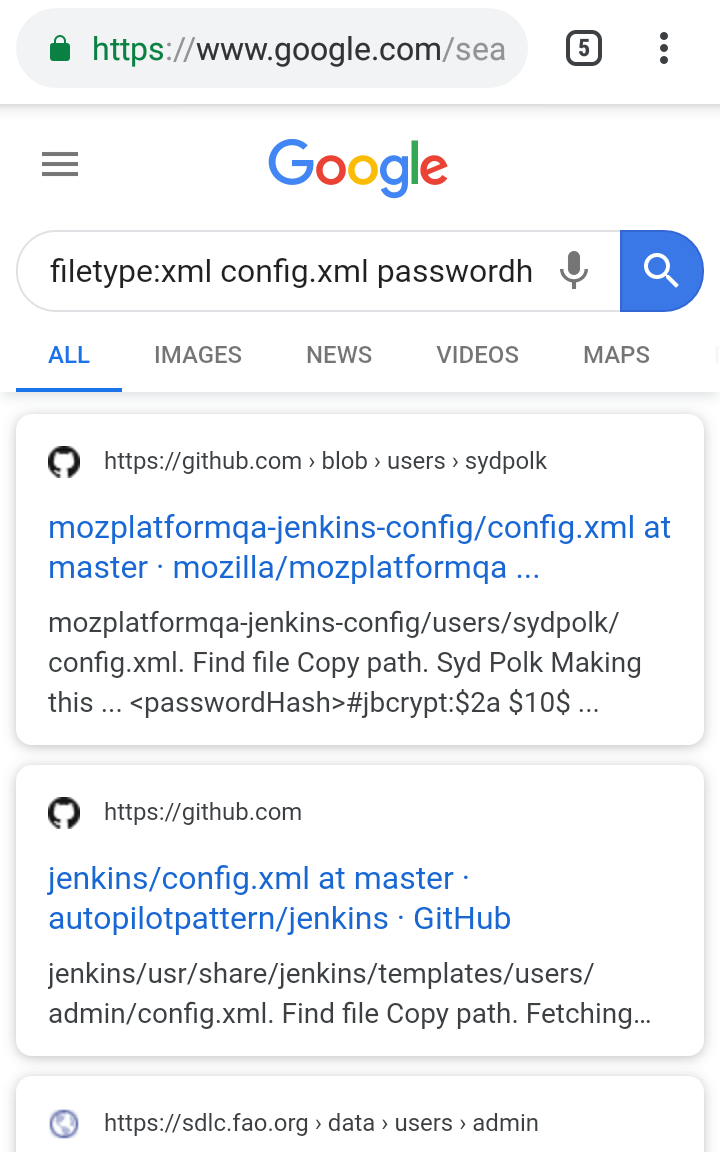
Google advanced search / GHDB
Getting revealed sensitive information about the target that is indexed on Google.
Crafting search queries by refereeing Google’s special parameters.
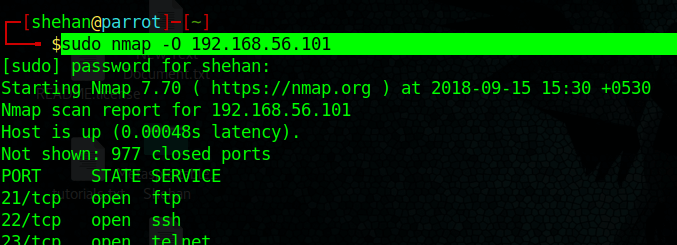
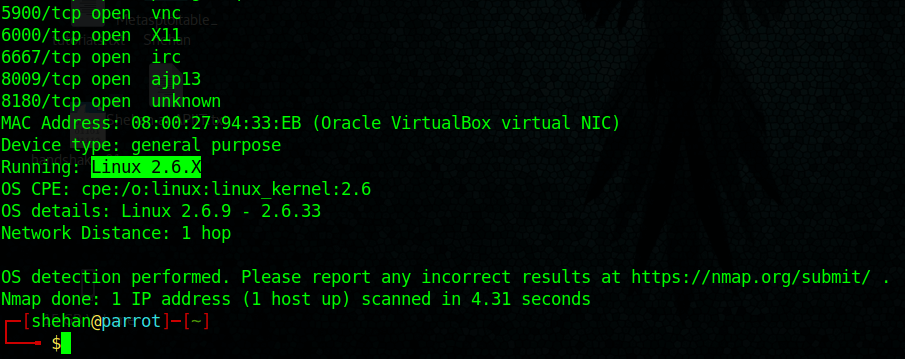
NMAP / ZENMAP / SuperScan / Hping / Xprobe2 / P0f
Identifying Ports and OSs running on the target.
Footprinting can be performed via NAMP as below.
Social Engineering
Gathering information about the target using psychological manipulation.
Dumpster diving, Phishing, Analysing Job Advertisements can be helpful to find further information about the target.
Phase 2: Attack
2.1 Introduction
In this phase, the pentester does a thorough scan to identify the vulnerabilities of the target and simulate the attacks, as mentioned by Graves (2010). This is the most critical phase of Penetration Testing, which typically takes the most considerable portion of the test workload.
2.2 Procedures
The following steps must be followed in the Attack phase, as suggested by the author.
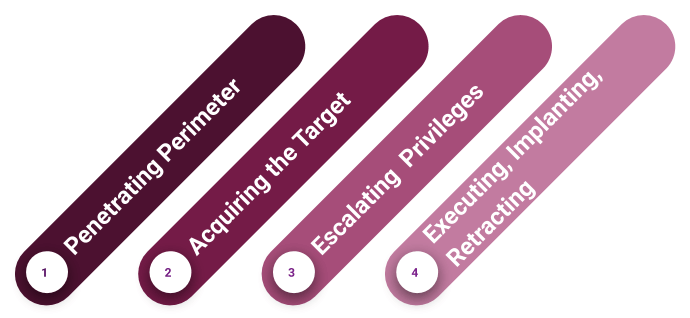
- Penetrating Parameter: Identifying user accounts, applications, opened ports, network configuration counted as this step. Especially testing and evading the firewall of the victim machine.
- Acquiring Target: Vulnerability Scanning and Auditing happens in this step. Vulnerability scanners can point out the vulnerabilities of individual remote hosts. However, vulnerability scanners generate a significant noise (logs), which can be noticed by the victim. Since the penetration testing happens with the authorization of the target, it is not a bad practice to use those tools.
- Escalating Privileges: Identifying and verifying the vulnerabilities that can be a real attack vector for the target by exploiting each identified vulnerability through remote host hacking or password cracking or any other hacking technique. After login, an attacker can collect the password hashes of the existing accounts on the target and decrypt those hashes with the help of a password cracking tool.
- Executing, Implanting, Retracting: At this phase, the target has already compromised by the penetration tester, and the activities done on the above step, such as file modification or execution of a script, can be affected to the business operations of the client. Therefore, this is the time for the tester to remove and undo the all exploiting level modification that has been executed.
2.3 Tools and Techniques
Nmap
Scanning ports bypassing the firewall.
By using nmap -f -p port-number IP-address command, a tester can scan the state of a port filtered by the target’s firewall.
Wafw00f
Identifying the firewall of a target.
wafw00f IP-address command reveals the information about the firewall availability on a target.
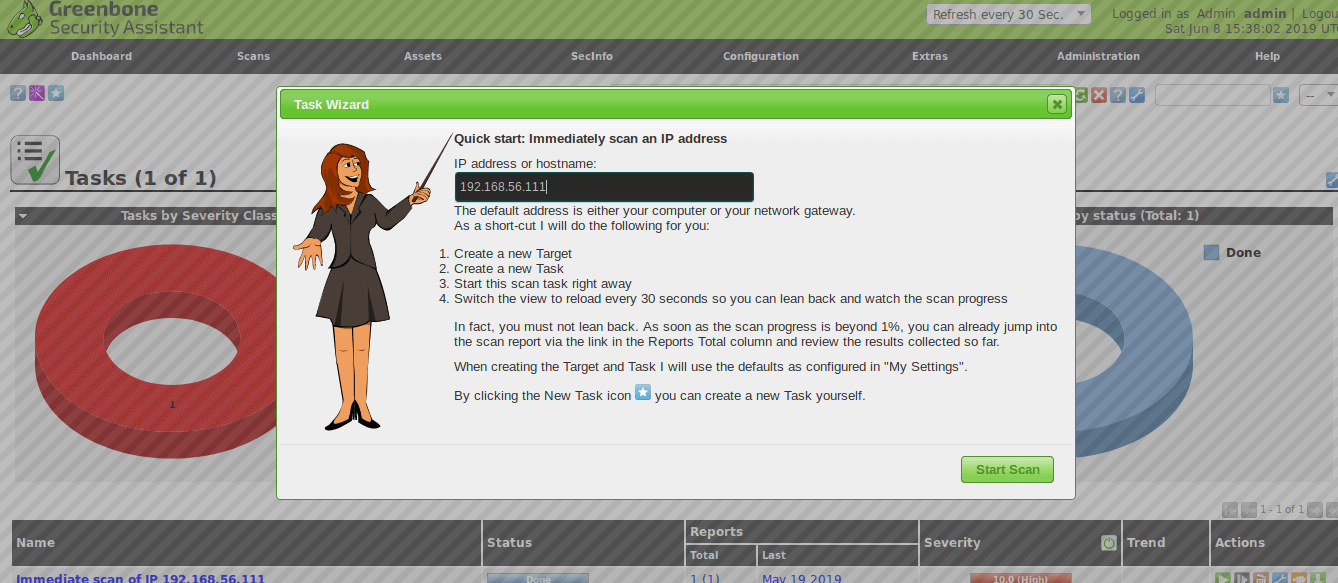
OpenVAS
Identifying all possible vulnerabilities on a host.
OpenVAS is an open-source vulnerability scanner that provides an in-depth view of the vulnerabilities of a host.
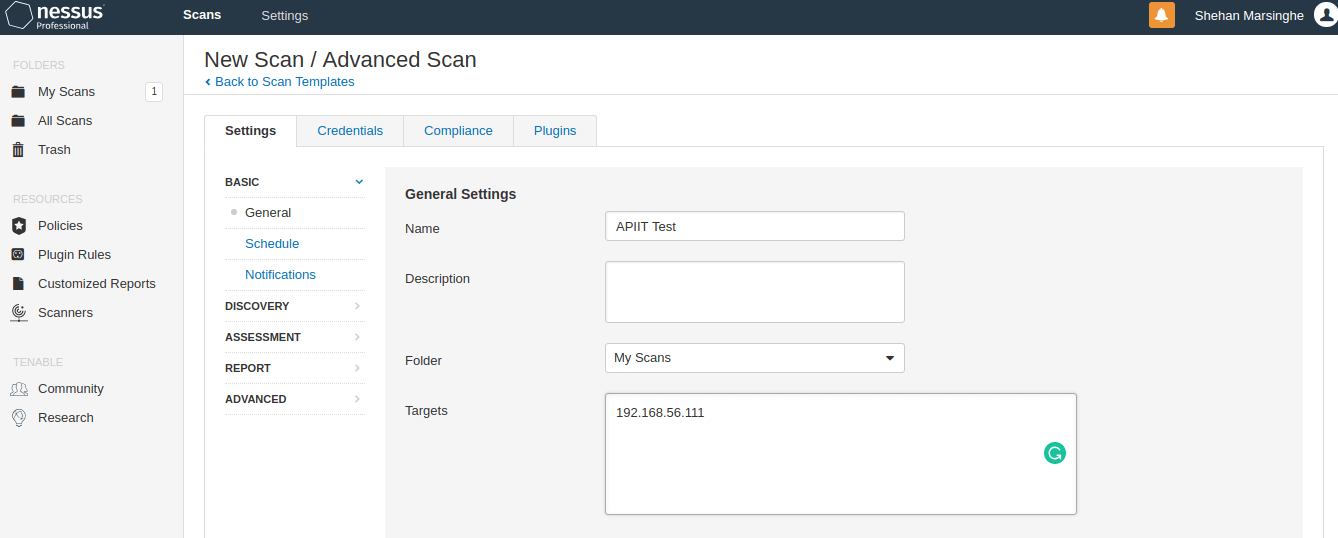
Nessus
Identifying all possible vulnerabilities on a host.
Nessus is a proprietary vulnerability scanner that presents a possible vulnerability list of a host in an organized manner.
Metasploit Framework
Exploiting targets through vivid remote host exploits.
Metasploit is a popular Pentesting framework developed by Rapid7 based on Ruby programming language.
The following commands guide how to exploit a target using Metasploit in the order.
- SEARCH keyword : Search for the exploit/payload.
- USE exploit_location : Selecting an exploit.
- SHOW OPTIONS : Showing all options that can be set up for the selected exploit.
- SET option value : Setting value to an option.
- SET PAYLOAD payload_location : Setting a specific payload for the exploitation.
- RUN or EXPLOIT : Carrying out the exploitation to the target.
Hydra
Exploiting a target via dictionary or brute force attacks.
Dumpster diving, Phishing, Analysing Job Advertisements can be helpful to find further information about the target.
Hydra is a stealthy brute force hacking tool that can be used to crack the credentials of many network protocols using the following command.
Hydra -V -l username_attack -P location_of_password_file -t number_of_threads -f -s target_IP protocol/port
Shadow Security Scanner, ISS Scanner, SARA, Retina are also well-known vulnerability scanners available to use at this phase.
Phase 3: Post-Attack
3.1 Introduction
In the Post-Attack, penetration testing restores the system back to the initial phase before starting the test. This clears all the files, logs and registry entries that are generated as a result of the penetration test and finalizes the penetration report as noted by Graves (2010).
3.2 Procedures
In this phase, the following deliverables should be provided to the client by the Penetration tester, according to Graves (2010).
- List of vulnerabilities in the order of most critical ones first
- Analysis of findings.
- Countermeasures to mitigate the identified threats.
- Restored network and system without any modifications or logs.
3.3 Tools and Techniques
The post-attack phase does not include any dedicatedly developed tools. However, backup service that a system or network uses can be accountable for restoring tasks.
References
BALOCH, R. (2017). Ethical Hacking and Penetration Testing Guide. London: CRC Press.
GRAVES, K. (2010). CEH Certified Ethical Hacker Study Guide. Indianapolis, Ind.: Wiley Pub., pp.343-358.