

This is a problem that many has come to when working with SCIM2 APIs. I think the main reason for this requirement to be a “problem” is the added complexity of the SCIM API. The target of this post to be the simplest guide on getting $subject done.
Enable SCIM Extension.
- Open the file <IS-HOME>/repository/conf/identity/provisioning-config.xml.
- Set the property user-schema-extension-enabled to true and save.
Adding SCIM Extension configs.
- Open the file <IS-HOME>/repository/conf/scim2-schema-extension.config
- Add the following configuration at the end of the file, before the last element of the JSON array.
{
"attributeURI":"urn:ietf:params:scim:schemas:extension:enterprise:2.0:User:customClaim",
"attributeName":"customClaim",
"dataType":"string",
"multiValued":"false",
"description":"Custom claim",
"required":"false",
"caseExact":"false",
"mutability":"readwrite",
"returned":"default",
"uniqueness":"none",
"subAttributes":"null",
"canonicalValues":[],
"referenceTypes":[]
},
- Add customClaim to the subAttributes element of the last element of the JSON array, as shown below.
...
{
"attributeURI":"urn:ietf:params:scim:schemas:extension:enterprise:2.0:User",
"attributeName":"urn:ietf:params:scim:schemas:extension:enterprise:2.0:User",
"dataType":"complex",
"multiValued":"false",
"description":"Enterprise User",
"required":"false",
"caseExact":"false",
"mutability":"readWrite",
"returned":"default",
"uniqueness":"none",
"subAttributes":"verifyEmail askPassword employeeNumber costCenter organization division department manager customClaim",
"canonicalValues":[],
"referenceTypes":["external"]
}
]
- Save the file and start the Identity Server.
Confusing? See the below GIF.
Adding the Custom Claim
- Start the identity server, log in to the management console and click on Add under Claims menu item.
- Click Add Local Claim.
- Fill the following.
- Claim URI: http://wso2.org/claims/customclaim
- Display Name: Custom Claim
- Description: Custom Claim
- Mapped Attribute (s):
- User Store Domain Name: PRIMARY
- Mapped Attribute: customClaim
- Check Supported by Default
- Click on Add.
Note: When adding the mapped attribute, remember the following.
- You can use the word customClaim (or any word you prefer) as the mapped attribute, only when using a JDBC user store. If you’re using LDAP or Active Directory, you’ll have to use an attribute that already exists in the user store. JDBC user store automatically creates a new attribute if it does not already exist, but LDAP and AD doesn’t do that.
- The above configuration is only valid when you’re using the primary user store. If you have a secondary user store configured, make sure to add another mapped attribute selecting the secondary user store as well.
Adding SCIM Claim Mapping
- Go to Claims > Add > Add External Claim.
- Fill the following information
- Dialect URI: urn:ietf:params:scim:schemas:extension:enterprise:2.0:User
- External Claim URI: urn:ietf:params:scim:schemas:extension:enterprise:2.0:User:customClaim
- Mapped Local Claim: http://wso2.org/claims/customclaim
Testing
- Create a new user.
- Users and Roles > Add > Add New User
- Provide details and add the user.
- Add a value to the customClaim of the new user.
- Users and Roles > List > Users
- Click on User Profile under the new user and select the default profile.
- Add some value under Custom Claim and save.
- Retrieve the user through SCIM and make sure the custom claim is present.
- Sample cURL
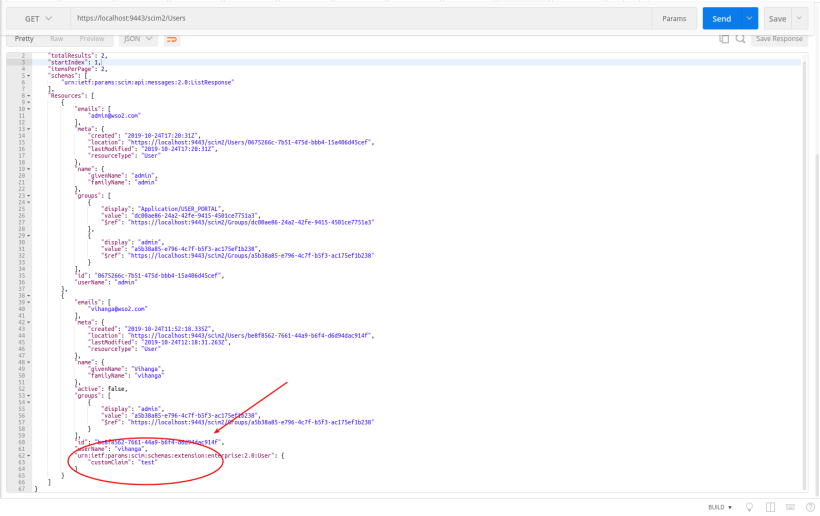
curl -v -k --user admin:admin https://localhost:9443/scim2/Users
- Sample response.
Updating the Custom Claim using SCIM
Execute the below cURL and check whether the claim is updated from the user profile.
curl -k -X PATCH \
  https://localhost:9443/scim2/Users/be8f8562-7661-44a9-b6f4-d6d94dac914f \
  -H 'Authorization: Basic dmloYW5nYTphZG1pbg==' \
  -H 'Cache-Control: no-cache' \
  -H 'Content-Type: application/json' \
  -H 'Postman-Token: 3cbbfd68-7f1f-4ce4-8b5e-ffb4b88c4171' \
  -d '{
   "schemas":[
      "urn:ietf:params:scim:api:messages:2.0:PatchOp"
   ],
   "Operations":[
      {
         "op":"replace",
         "value":{
            "urn:ietf:params:scim:schemas:extension:enterprise:2.0:User": {
                 "customClaim": "new value"
            }
         }
      }
   ]
}'
Done! 😀

June 23, 2020 at 11:33 am
Unable to see updated claims in the scim2user api after adding above claim – tried for account lock.
Requirement is to get users who are locked. Please help asap
LikeLike