
Back once again it’s Linux time. This post also can be named as how to set up a floating IP between load balancers or how to set up a shared IP for between load balancers or how to configure a high available load-balancers. what happens here we are using keepalived, which allows us to setup HAProxy nodes to create active/passive cluster so that load can be divided amount node members. If the main HAProxy node goes down, the second one(slave node) will be elected as master node. We are getting it done using VRRP.
What & How VRRP Works
The VRRP protocol provides automatic assignment of available IP to participating hosts which ensures that one of participating nodes is master. The master and slave node acts as a group where the backup node listens for multicast packets from a node with a higher priority which could the master node. If the backup node fails to receive VRRP advertisements for a period of time longer than three times of the advertisement timer, the backup node takes the master state and assigns the configured shared/floating IP to itself. In case there are more than one backup nodes with the same priority, the one with the highest IP wins the election.
Keepalived is a routing software written in C. The main goal of this project is to provide simple and robust facilities for loadbalancing and high-availability to Linux system and Linux based infrastructures.
HAProxy is a free, very fast and reliable solution offering high availability, load balancing, and proxying for TCP and HTTP-based applications. It is particularly suited for very high traffic web sites and powers quite a number of the world’s most visited ones.
Today what we are trying to implement the load balancer cluster as follows. It’ll be an active/passive load balancer cluster
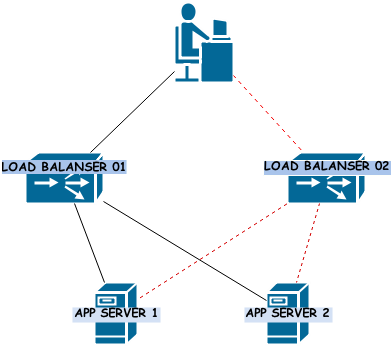
I’m using below IPs for explanation purposes.
- Master node address: 192.168.6.169
- Slave node address: 1192.168.6.170
- Shared/Floating Virtual address: 192.168.6.164
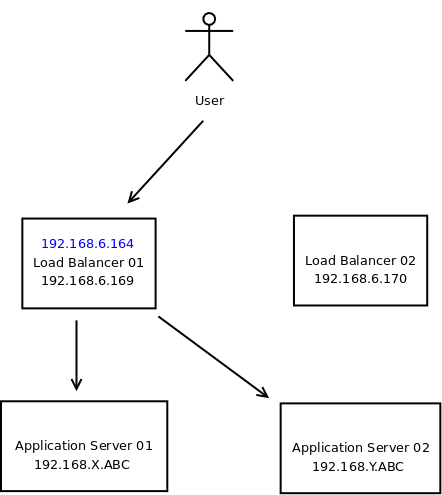
Below mentioned is the two scenario that can occur within a active/passive load balancer cluster.
Configuring HAProxy and Keepalived
Install HAProxy and Keepalived on both ubuntu nodes.
apt-get install haproxy
apt-get install keepalived
Load balancing in HAProxy also requires the ability to bind to an IP address that are nonlocal, meaning that it is not assigned to a device on the local system. Below configuration is added so that floating/shared IP can be assigned to one of the load balancers. Below line get it done.
net.ipv4.ip_nonlocal_bind=1
Now you know what’s happening with above lines let’s edit the sysctl.conf.
vim /etc/sysctl.conf
Add the below lines.
net.ipv4.ip_nonlocal_bind=1
To enable the changes made in sysctl.conf you will need to run the command.
root@S-09:~# sysctl -p
net.ipv4.ip_nonlocal_bind = 1
Now let’s create keepalived.conf file on each instances. All the below Keepalived configurations are explained in the User guide provided by Keepalived and refer this guide as well.
vim /etc/keepalived/keepalived.conf
Add the below configuration on the master node
global_defs {
# Keepalived process identifier
lvs_id haproxy_DH
}
# Script used to check if HAProxy is running
vrrp_script check_haproxy {
script "killall -0 haproxy"
interval 2
weight 2
}
# Virtual interface
# The priority specifies the order in which the assigned interface to take over in a failover
vrrp_instance VI_01 {
state MASTER
interface eth0
virtual_router_id 51
priority 101
# The virtual ip address shared between the two loadbalancers
virtual_ipaddress {
192.168.6.164
}
track_script {
check_haproxy
}
}
Add the below configuration on the slave node.
global_defs {
# Keepalived process identifier
lvs_id haproxy_DH_passive
}
# Script used to check if HAProxy is running
vrrp_script check_haproxy {
script "killall -0 haproxy"
interval 2
weight 2
}
# Virtual interface
# The priority specifies the order in which the assigned interface to take over in a failover
vrrp_instance VI_01 {
state SLAVE
interface eth0
virtual_router_id 51
priority 100
# The virtual ip address shared between the two loadbalancers
virtual_ipaddress {
192.168.6.164
}
track_script {
check_haproxy
}
}
Restart Keepalived.
service keepalived start
Now let’s configure HAProxy on both instances. You will have do the below steps on master node as well as slave node.
vim /etc/default/haproxy
set the property ENABLED to 1.
vim /etc/haproxy/haproxy.cfg
Note that below configurations are as per my requirement.
global
        log 127.0.0.1   local0
        log 127.0.0.1   local1 notice
        #log loghost    local0 info
        maxconn 4096
        #chroot /usr/share/haproxy
        user haproxy
        group haproxy
        daemon
        #debug
        #quiet

defaults
        log     global
        mode    http
        option  httplog
        option  dontlognull
        retries 3
        option redispatch
        maxconn 2000
        contimeout      5000
        clitimeout      50000
        srvtimeout      50000

listen stats 192.168.6.ABC:8989
        mode http
        stats enable
        stats uri /stats
        stats realm HAProxy\ Statistics
        stats auth admin:admin

listen am_cluster 0.0.0.0:80
        mode http
        balance roundrobin
        option httpclose
        option forwardfor
        cookie SERVERNAME insert indirect nocache
        server am-1 192.168.X.ABC:80 cookie s1 check
        server am-2 192.168.Y.ABC:80 cookie s2 check
If above configurations are not clear please refer this guide from HAProxy.
Testing
Let’s check whether our configuration has been done correctly. Try executing ip addr on master node. As you can see on the master node 192.168.6.164 IP is assigned.
root@S-08:~# ip addr
1: lo: <LOOPBACK,UP,LOWER_UP> mtu 16436 qdisc noqueue state UNKNOWN
link/loopback 00:00:00:00:00:00 brd 00:00:00:00:00:00
inet 127.0.0.1/8 scope host lo
inet6 ::1/128 scope host
valid_lft forever preferred_lft forever
2: eth0: <BROADCAST,MULTICAST,UP,LOWER_UP> mtu 1500 qdisc pfifo_fast state UP qlen 1000
link/ether 00:50:56:bb:05:06 brd ff:ff:ff:ff:ff:ff
inet 192.168.6.169/28 brd 192.168.6.175 scope global eth0
inet 192.168.6.164/32 scope global eth0
inet6 fe80::250:56ff:febb:506/64 scope link
valid_lft forever preferred_lft forever
Try executing ip addr on slave node.
root@S-09:~# ip addr
1: lo: <LOOPBACK,UP,LOWER_UP> mtu 16436 qdisc noqueue state UNKNOWN
link/loopback 00:00:00:00:00:00 brd 00:00:00:00:00:00
inet 127.0.0.1/8 scope host lo
inet6 ::1/128 scope host
valid_lft forever preferred_lft forever
2: eth0: <BROADCAST,MULTICAST,UP,LOWER_UP> mtu 1500 qdisc pfifo_fast state UP qlen 1000
link/ether 00:50:56:bb:05:08 brd ff:ff:ff:ff:ff:ff
inet 192.168.6.170/28 brd 192.168.6.175 scope global eth0
inet6 fe80::250:56ff:febb:508/64 scope link
valid_lft forever preferred_lft forever
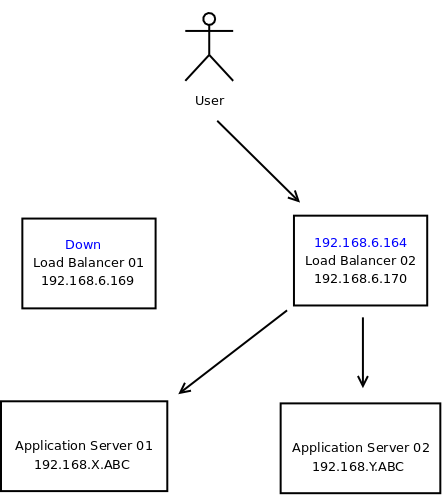
Let’s stop the HAProxy on the master node. Now you can see that IP address 192.168.6.164 will be assigned to the slave node. If you start HAproxy instance on the master node IP address 192.168.6.164 will be assigned back to master node. See the O/P below.
root@S-08:~# ip addr
1: lo: <LOOPBACK,UP,LOWER_UP> mtu 16436 qdisc noqueue state UNKNOWN
link/loopback 00:00:00:00:00:00 brd 00:00:00:00:00:00
inet 127.0.0.1/8 scope host lo
inet6 ::1/128 scope host
valid_lft forever preferred_lft forever
2: eth0: <BROADCAST,MULTICAST,UP,LOWER_UP> mtu 1500 qdisc pfifo_fast state UP qlen 1000
link/ether 00:50:56:bb:05:06 brd ff:ff:ff:ff:ff:ff
inet 192.168.6.169/28 brd 192.168.6.175 scope global eth0
inet6 fe80::250:56ff:febb:506/64 scope link
valid_lft forever preferred_lft forever
root@S-09:~# ip addr
1: lo: <LOOPBACK,UP,LOWER_UP> mtu 16436 qdisc noqueue state UNKNOWN
link/loopback 00:00:00:00:00:00 brd 00:00:00:00:00:00
inet 127.0.0.1/8 scope host lo
inet6 ::1/128 scope host
valid_lft forever preferred_lft forever
2: eth0: <BROADCAST,MULTICAST,UP,LOWER_UP> mtu 1500 qdisc pfifo_fast state UP qlen 1000
link/ether 00:50:56:bb:05:08 brd ff:ff:ff:ff:ff:ff
inet 192.168.6.170/28 brd 192.168.6.175 scope global eth0
inet 192.168.6.164/32 scope global eth0
inet6 fe80::250:56ff:febb:508/64 scope link
valid_lft forever preferred_lft forever
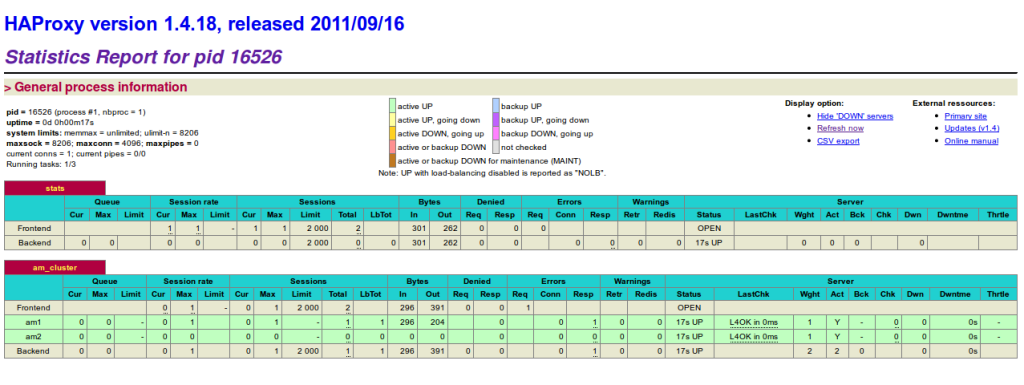
Try http://192.168.6.169:8989/stats or http://192.168.6.170:8989/stats URL to login into statistics report for HAProxy.
If you have any questions let me know in the comments below. Your feedback is highly appreciated(happy-face).
![]()


Hello,
Can you explain what needs to be done on the network side for the “floating IP” to work? Is that IP supposed to be assigned to both HAProxy servers’ switch ports?
Thanks
thanks, nice tutorial!
You have a typo in the sentence “Let stop the HAProxy on the master node. Now you can see that IP address 192.168.6.164 will be assigned to the salve node”. “Salve” I guess should be slave instead.
Noted and corrected
Hi, After stop haproxy in centos7, keepalived is not switching over to the to backup keepalived, and user is unable to access the web server. Only after stoping the keepalived then automatically backup is working.
You must check the keepalived configuration again.
Hi. I have the same issue with ABHIJIT. I am using the latest version of keepalived and is running a Centos 6.7 machine. I also tried to copy your config directly, and still doesn’t work. Do you have any idea why?
Did you ever figure out how to resolve this, I can get my virtual ip just fine, but when I stop haproxy it is not dropping the IP and picking it up on the other server, I know this is old and nobody probably looks at it, but I hope they do.
Pingback: Haproxy Balancer Database + keepalived – "DOKUMENTASI"
Is there a way to get ha-proxy to bind only to the virtual ip and still have ha-proxy start up correctly on the backup when it does not have the virtual ip? I can’t have it binding to all IP address’s. It will mess other things up.
This walk through seems to be very thorough. The top diagram said Balanser, it should be Balancer. Phonetically spelt correct though.
Pingback: 澳门威尼斯人开户-威尼斯人开户注册-威尼斯人开户网-
I have 2 master and 1 slave . HA proxy is installed on both master nodes. Stopping on master1 ip is showing in master2 but if I am powering off master1 then its not showing in master2. Please help me on this.
Thanks in advance